HUD Editor Part 2: Creating a Static HUD

Hand2Note allows you to create or edit static HUD panels. This enables players to customize the HUD according to their comfort and gaming needs.
In this article, we will demonstrate how to create a static HUD.
Creating the HUD
Steps to create a HUD:
- Define the appearance, content, and functionality of the HUD;
- Create or find the necessary stats;
- Create the HUD profile;
- Create the HUD panel and cells. Fill them with the necessary stats;
- Set the display properties of the HUD cells and panels.
Defining the Appearance, Content, and Functionality of the HUD
First, we need to determine which stats and in what format we want to see in the HUD being created:
- First row of the HUD, stats from left to right: “VPIP”, “PFR”, “Fold to 3Bet”, “3Bet“, “Fold to 4Bet”, “4Bet Range”;
- Second row of the HUD, stats from left to right: “WTSD%”, “WWSF%”, “WonSD%”, “Aggression Frq Flop%”, “Aggression Frq Turn%”, “Aggression Frq River%”;
- Third row of the HUD, stats from left to right: total number of hands (“Hands”), “Winrate bb/100”.
The panel and cells of the HUD will use only common display properties, which defines the created HUD as static. Specifically:
- Enable alignment of stats to the top-left corner of the HUD panel;
- Set the background color of the HUD cells to black;
- Reduce the padding between stats and cell edges to more comfortable levels;
- Set color ranges for the Winrate bb/100 stat fonts.
All the necessary stats were created in advance in the stat editor.
Creating the HUD Profile
The functions for creating or editing a HUD profile are located in the HUD editor menu. You can learn more about its navigation and capabilities in the article: “HUD Editor: Features and Navigation”.
To create a HUD profile in the main window of Hand2Note, open the HUD editor by clicking on “HUD Editor”(1).

Then, find the label “New HUD”(2) and click on it. Enter the name of the HUD profile in the area (3) and click “OK”(4) to create it.
Creating the HUD Panel and Cells and Filling Them with Necessary Stats
Now we need to create the HUD panel. To do this, in the HUD editor window, find the label “New Table”(1) and click on it. In the visual HUD panel creation window, we need to set the necessary panel and activate it by clicking.
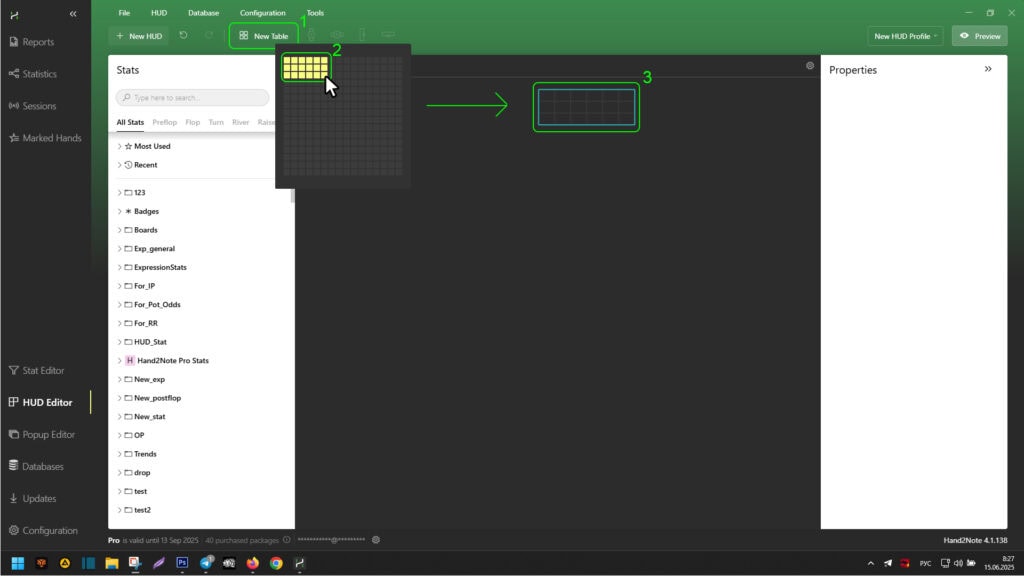
Since the maximum width of the HUD is six stats per row and the height is three rows, the size of the HUD panel should be set to three vertically and six horizontally (2). After this, a HUD panel with six by three cells will appear in the HUD editor window (3).
To fill a HUD cell with the required stat, find it using area (1).

Then, using the left mouse button (LMB), grab it (2), drag it to the desired cell, and release the LMB (3). Repeat these steps for each necessary stat and cell.
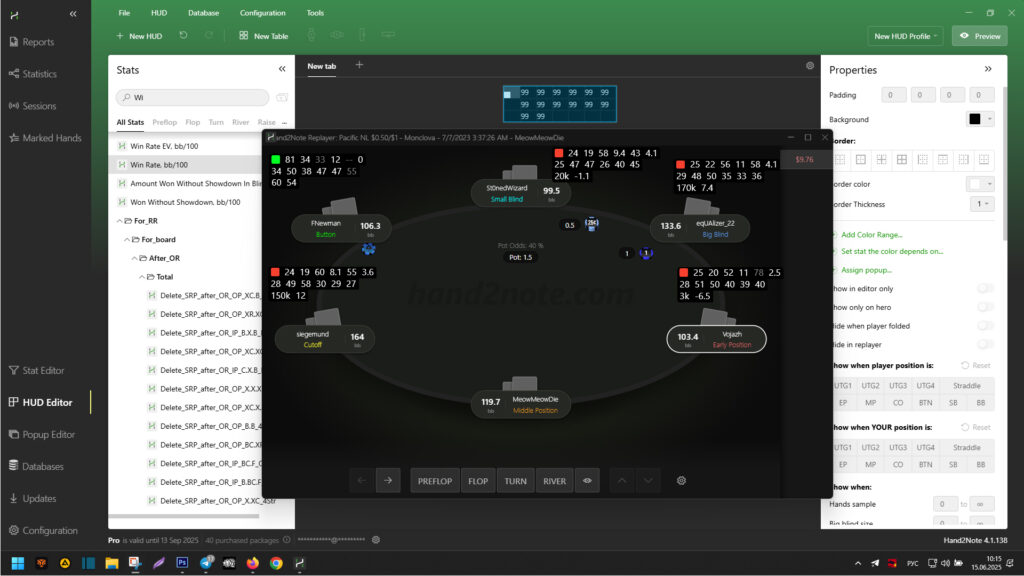
After filling the HUD cells with the necessary stats, you can already see the appearance of the HUD through the replayer.

To do this, find the “Preview”(1) button at the top-right of the HUD editor window and click on it. After viewing, close the replayer window.
If necessary, you can add a note indicator. In our example, we decided to add it to the left of all the stats in the already created HUD panel. To do this, right-click (RCM) on any of the leftmost cells in the HUD panel (1).

In the dropdown list, hover over “Table”(2) and in the secondary dropdown list, click on “Insert column left”(3).
Then, in the newly created column on the left, right-click on any empty cell (1) and in the dropdown list, hover over “Insert”(2). In the secondary dropdown list, select “Note indicator”(3).

To preview the result, call the replayer window again by clicking on “Preview”(1).

Setting Display Properties for HUD Cells and Panels
As you can see in the replayer (2) in the screenshot above, the HUD shifts significantly to the right horizontally and lacks a background color. The padding between stats and cell edges is too large and inconvenient. Additionally, color settings need to be added for the WinRate bb/100 stat: red for negative values and green for positive values. To make these adjustments, you need to edit the display conditions for the HUD cells and panels.
To align the stats in the HUD horizontally from the left edge, select the entire HUD panel by clicking on its outer edge with the LMB (1).

Then, in the additional display conditions menu, check the box next to “Display as horizontal stacks”(2).
You can see using “Preview” that the HUD now aligns the stats relative to the left edge.

To color the HUD background, select the necessary cells using the LMB and holding the “Ctrl” key (1).
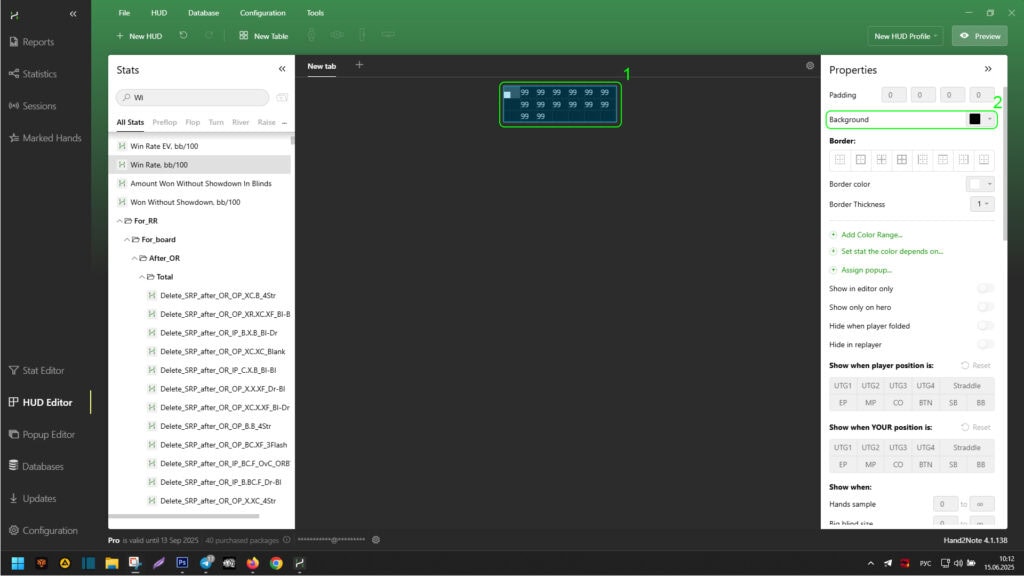
Then, in the additional display conditions menu, set the desired background color next to the “Background” label (2).
You can see using “Preview” that the HUD now has a background color.
To change the padding of stats from the cell edge, select the necessary cells using the LMB and holding the “Ctrl” key (1).
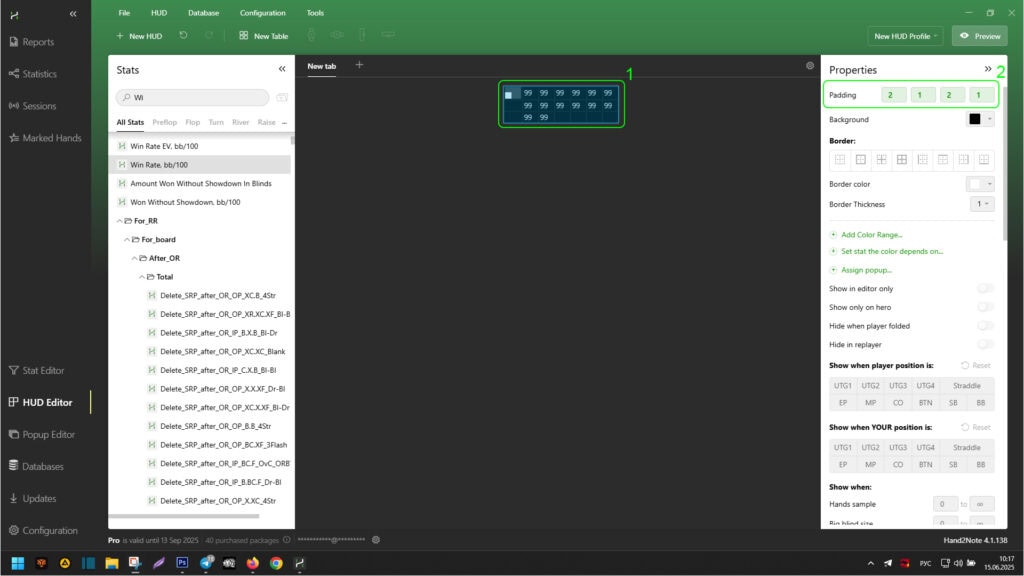
Then, in the additional display conditions menu, set the necessary padding of the stat from the cell edges next to the “Padding” label (2).
The standard padding of stats from the edges is “4” : “2” : “4” : “2”.
You can see using “Preview” that the HUD has become more compact and convenient.

To edit the color of the WinRate bb/100 stat, select it in the HUD editor using the LMB (1).

Then, in the additional display conditions menu, double-click on “Add Color Range…” to add two color ranges (2). Edit each range as needed (for example: from “0” to “∞” – green color, from “-∞” to “0” – red color) (2).
The infinity symbol (“∞“) can be copied from any values below for entering into ranges.
You can see using “Preview” that the WinRate bb/100 stat now has different colors depending on its values and according to the color ranges we set.

Since we used only common display properties for the HUD cells or panels, our HUD is static.
Conclusion
Thus, you can create or edit any static HUD to suit your comfort or gaming needs.
In the next article – HUD Editor: Creating a Positional HUD – we will show you how to apply positional properties to this HUD. This will help make it more compact and the displayed information more relevant in terms of player positions at the table.
Latest guides
-

 Hand2Note Popup Editor: Creating a Professional Popup Mar 28, 2026
 -
 Hand2Note Pro Pricing Reduced in 2026 Mar 19, 2026
 -
 How to Analyze Fish Ranges: Limp, Limp-Raise, and Limp-Fold Mar 13, 2026
 -
 Hand2Note Popup Editor: Creating a Simple Popup Mar 10, 2026
 -
 Hand2Note 4.1: Overview of key updates 2025–2026 Mar 10, 2026
We regularly publish new Hand2Note 4 guides on our Discord server.
Join Discord Server