Hand2Note Popup Editor: Creating a Simple Popup
The main advantage of Hand2Note is deep customization. It allows you to create unique popups with an individual set of statistics. This eliminates “information noise” and provides the player with only the necessary numbers at a critical moment, directly speeding up decision-making and positively affecting results.
The popup editor in Hand2Note is intuitive, but to work confidently, it’s worth understanding its navigation. In this article, we will explore the control elements in the editor and create our own small popup.
Popup editor navigation
Creating any popup begins with familiarizing yourself with the editor’s interface. To enter it, open the left navigation menu in the main Hand2Note window and click on POPUP Editor (1).
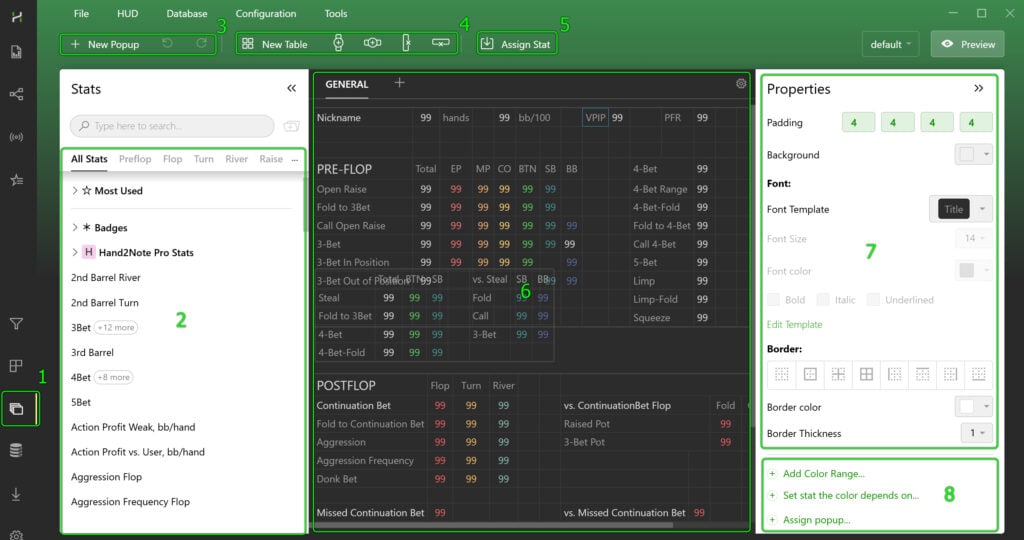
- (2) List of available stats
Here you can find any statistical indicator from the current configuration and apply it in the popup. - (3) Popup management
Buttons for creating a new popup, as well as undoing or redoing the last actions during editing. - (4) Structure navigation
Tools for adding new panels, rows, and columns, as well as for deleting selected elements. - (5) Inserting stats
Allows you to quickly add the selected stat from the configuration to the current cell or panel. - (6) Preview area
The central part of the window where the editable popup is displayed in real-time. - (7) Display settings
Appearance parameters for panels and cells: font size and color, border color and thickness, and other visual settings. - (8) Additional cell options
Advanced settings for data behavior and display:- Add Color Range… — set up changing the color of the stat in the cell depending on its value.
- Set stat the color depends on… — link the stat color to the value of another indicator from the configuration.
- Assign popup… — attach another popup to the cell, which will open on click or hover.
- Popup selection and preview (top right corner)
In this area, you can select another popup for editing by clicking on its name. Next to it is the Preview button, allowing you to see how the edited popup will look in the final form.
Creating a simple popup
To better understand the possibilities of customizing statistics, let’s look at a practical example. We will create a simple yet informative popup that includes basic preflop and postflop stats, as well as key complex metrics: Aggression Frequency, WWSF (Won When Saw Flop), WonSD (Won at Showdown), and WAtSD (Went to Showdown). This set will provide a complete picture of the opponent’s playing style.

Creating a popup
To create a new popup in Hand2Note and start configuring it, follow these instructions:

- Open the popup editor in the main program window.
- Click the “+ New POPUP” button to create a new popup.
- In the input field that appears, give your popup a name.
- Click “OK” to save the changes.
- After creation, make sure your new popup is open in the editor (it is usually highlighted or displayed in the workspace). If not, simply select it from the list to start editing.
Filling the popup with stats and text
Before filling the popup with statistics and text, you need to create a working panel with cells inside it. Here’s how to do it:
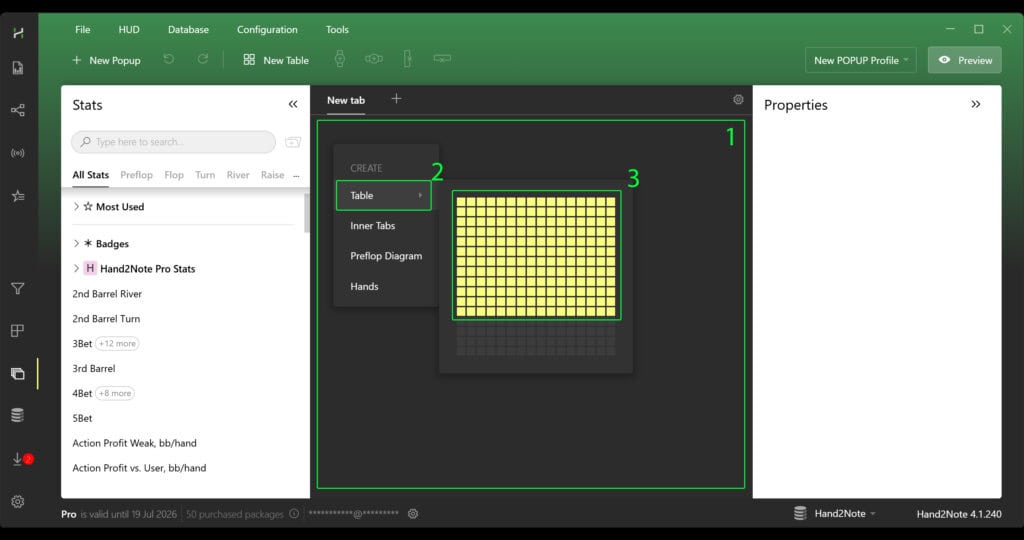
- In the editor’s workspace (the empty space inside your popup), right-click.
- In the context menu that appears, hover over the “Table” option.
- A pop-up grid will open where you can select the desired panel size (e.g., 3×3, 4×4, etc.).
- Left-click on the selected size — the panel with cells will appear in the popup.
You can now start filling the cells.
Filling the popup starts with labels — they help navigate the statistics. Simply double-click on any free cell inside the popup panel (1) and enter the text.

Sometimes you need more space for one group of stats — for example, to create a general heading. In this case, merge the cells:
• Hold Ctrl and click on the desired cells one by one (they will be highlighted).
• Right-click on any of the selected cells (2).
• In the menu, select “Merge” — the cells will merge into one large area (3).
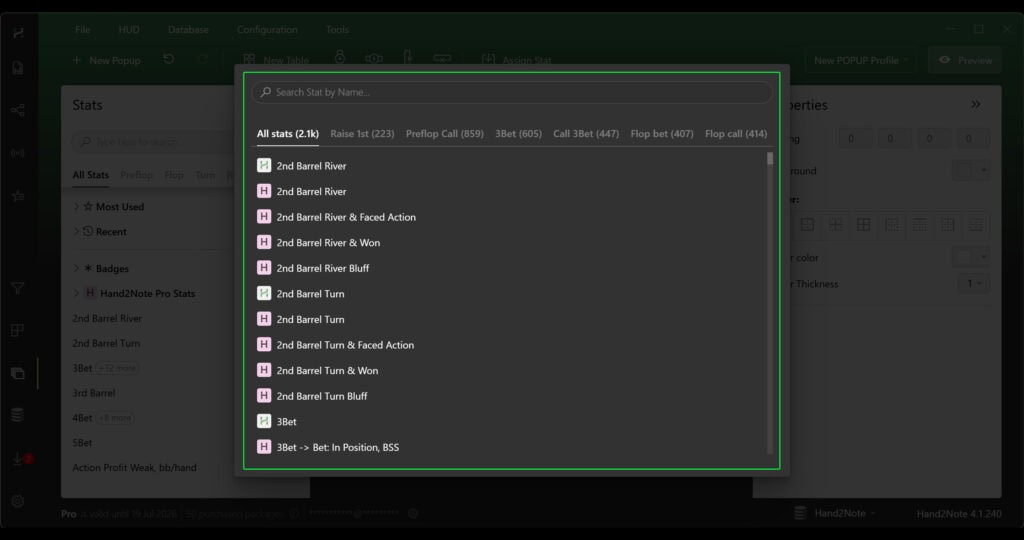
To fill the popup with stats, right-click on the desired cell (1), in the menu select “Insert” (2) → “Stat…” (3).

After that, in the list that opens, you only need to find and select the necessary stat by name.
After filling the popup, you can preview it. To do this, click the “Preview” button (1), and the popup itself will open (2).

Visual customization of the popup
In the screenshot above, you can see that the statistics in the popup are displayed correctly, but the visual design still leaves much to be desired. Let’s move on to customizing the appearance — fonts, colors, cell sizes, and other parameters that will make the popup truly convenient.
Let’s start the visual customization with padding. Select all the cells in the popup panel (1). In the menu on the right, find the “Padding” parameter and set the values (e.g., 4, 3, 4, 3) (2). Use the Preview mode to check how the text and stats are aligned inside the cells (3).

After setting the padding, move on to aligning the content inside the cells. This is important to ensure that the text and numbers are aligned and do not create visual chaos:

- Select the cells you want to align. You can select individual cells (with Ctrl held down) or the entire panel at once.
- Right-click on the selected area (1).
- In the context menu, hover over the “Alignment” option (2).
- In the table-grid that appears, choose the desired alignment option (3):
• Horizontally: left, center, right.
• Vertically: top, center, bottom. - Open the Preview mode and make sure that the text and stats are aligned exactly as you intended (4).
Cell borders help structure the popup: you can separate headings from stats, highlight important blocks, or, conversely, remove unnecessary lines to make the popup look lighter.

To customize the borders:
- Select the cells you are working with (1).
- In the right panel, find the “Border” section (2). Here you can:
- choose which sides of the cells to style (e.g., only bottom borders to separate rows);
- set the line color (it’s better to use muted shades to avoid overloading the popup);
- set the border thickness (usually 1-2 pixels is enough).
- After setting up, click Preview and check how neat the table looks now (3).
Proper font customization helps visually separate labels and statistical values. This shifts the focus to the numbers, allowing for quicker navigation in the popup and decision-making at the table.

To customize fonts in the popup cells, follow these steps:
- Select the cells where you want to change the text formatting (1).
- In the right part of the editor, find the “Font:” section (font settings) (2).
- In this section, the following parameters are available:
- Font Template — a dropdown list with ready-made font templates. You can choose one of the preset options.
- Font Size — font size adjustment. Enter the desired value or select from the list.
- Font Color — text color setting. Click on the palette and choose the appropriate shade.
- Font Style — buttons for applying styles:
- Bold (bold)
- Italic (italic)
- Underlined (underlined)
- Save as template — button to save the current settings as a new template for quick application to other cells in the future.
After completing the settings, use the Preview mode to evaluate the result (3).
The final touch is organizing the popup tabs. Let’s move the styled tab to the left side and give it a clear name.

- How to move tabs to the left:
- Click on the gear icon in the tab area (3).
- In the dropdown menu, hover over the “Tab Placement” option (4).
- Select the “Left” option — all tabs will move to the left side (5).
- How to rename a tab:
- Right-click on the name of the tab you want to rename. (1)
- In the context menu, select “Rename” (2).
- Enter the new name and press Enter.
After all the settings, be sure to use the “Preview” mode to ensure that the tabs look and function exactly as you intended (6).
Conclusion
Now you know how to create a fully functional popup from scratch in Hand2Note. From the first steps (“+ New POPUP”) to advanced settings (padding, borders, fonts, and much more). But the main takeaway from this guide is that any popup can and should be customized to your liking. There is no single correct option — there is one that is convenient for you. Use the preview, test different color schemes, experiment with the arrangement of elements. And don’t forget to save successful solutions as templates — this will save you hours of work in the future.
Latest guides
-
 Hand2Note Popup Editor: Creating a Professional Popup Mar 28, 2026
 -
 Hand2Note Pro Pricing Reduced in 2026 Mar 19, 2026
 -
 How to Analyze Fish Ranges: Limp, Limp-Raise, and Limp-Fold Mar 13, 2026
 -
 Hand2Note Popup Editor: Creating a Simple Popup Mar 10, 2026
 -
 Hand2Note 4.1: Overview of key updates 2025–2026 Mar 10, 2026
We regularly publish new Hand2Note 4 guides on our Discord server.
Join Discord Server